wtorek, 19 stycznia 2016

Annual Pattern Sale


Just a quick shout-out to let you know that....
It's my BIRTHDAY!!!
and...
that I am holding my annual Birthday-Sale like every year, time where you can get each and every one of my self-published knitting patterns at a 40% discount (only on etsy or on ravelry)! The sale is already running and ends January 23trd at midnight Central European Summer Time. (check this site here to find out what time this would be in your own local time zone).
 

środa, 4 listopada 2015

Magic adjustable ring tutorial

Magic ring is a crochet method to begin first round without making beginning row of few chains.
If you are not familiar how it make it, please follow tutorial below:
 

poniedziałek, 14 września 2015

Kitchener Stitch Tutorial


Kitchener Stitch is for grafting two edges 
of stockinette stitch together.
 
 For the purpose of this tutorial, I have used a contrasting piece of yarn, but you can certainly use the tail of one of your pieces. It’s best if the tail comes from the piece that is at the back. Make sure the tail or contrasting piece of yarn is about three times as long as the edge you want to graft. Thread your tail through  tapestry needle and let’s start!


niedziela, 13 września 2015

Make Short Rows Neater With This Japanese Technique Tutorial

 
Why learn the Japanese method?

The standard wrap and turn works well for most short row shaping, but even the most professional knitter can still leave a loop at the back that sticks out a little.
Short rows can add smooth, even curves to anything from a sleeve to a bust, but wrap and turn isn’t always the best option.

The solution? A Japanese knitting tutorial that might forever change the way you shape those short rows. Ready to learn one of the Japanese knitting techniques that will forever change your short rows? Let’s do it!


I find that using scraps of yarn in JSR technique work the best but if there are too many turns the more handy solution is to use one long scrap yarn, which is placed at every short row turn, and then pulled off when working with saved wrap:

czwartek, 27 sierpnia 2015

Give a texture to your knitwear by using pleats or "folds"


Here's the tutorial how to make the horizontal pleats,
shown by using two ways of marking the designated row / round: with a lifeline or with reverse stockinette stitch.

Click on the photo (with right button of your mouse and the choose "show me the picture") to see it larger:


Lateral Braid as a way to decorate your knitwear and more...


It can be used to decorate and give a polish to the knitted piece with no doubth.
Although I found it very helpful as a way to tighten stitches in
in a place they could get veeery sloppy. Lateral Braid can be used as a prevention of folding as well.
One little braid and so many possibilities...
Here's the tutorial for Lateral Braid (click on the photo to see it larger):


TIP: before starting to do Lateral Braid, make sure your stitches are "located" knitwise on the needle, it's easy when you purl russian style, if not reverse the stitches in a way that right "leg" of a stitch is at back, left is in front of the needle .

Here is tutorial for Lateral Braid knitted across whole row, although it can be made around too (click on the photo to see it larger):


Here is tutorial for Lateral Braid knitted in between other stitches:

niedziela, 19 kwietnia 2015

Provisional CO & Tubular CO for 2x2 rib


Tubular cast on creates neaten and yet elastic beginning edge. This method can be used for working either your knitwear flat or in round. If you're working in the round you should work the cast on and 2 tubular rows on straights before switching to your circulars and joining the round.
 
TIP: I like to use much thinner yarn for provisional CO then working ayrn and smaller size of spare needle then working needles, it makes things much easier to pick up the stitches.
 
Please note that for tubular CO you need to provisional CO half of your total number of stitches onto your working needles.

What you'll need to make provisional CO and then tubular CO:

a set of working needles or circulars, spare needle, crochet hook, working yarn and spare yarn, to make things clearer I used bamboo needles as my working needles and an acryle one as my spare needle

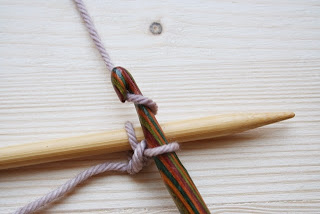
with spare yarn and crochet hook make a knot and chain 1


join working needle, bring the yarn from the back around needle to the front, and chain 1

bring the yarn back to the back of a needle


  bring the yarn to the back


again draw up a loop bringing the yarn from back to front of needle and chain 1


repeat to wave yarn around the needle and chain 1 untill you reach the number of stitches you wanted to cast on


make a few more chains without waving yarn around the needle and secure last chain with locking marker (optional, if you are worry about ripping, as I am :)) now you have the provisional cast on row which can be used to many other knitting projects, but in this tutorial in next step I'll focus on tubular cast on


join the working yarn to start knitting as usual


beginning with a knit row, work 4 rows in stockinette stitch


unzip provisional cast on, and slip the stitches on spare needle, note that first stitch won’t really seem like a real stitch but a loop of yarn, make sure you slip it onto the needle anyway 


you will now have half your total number of stitches on your working needle and half on the spare needle, slide the stitches along the spare needle so that both needle points are positioned next to the working yarn, I’m aiming for a 2×2 rib arranged: p1, (k2, p2), k2, p1, for other arrangements you will need to adapt the following directions


fold the spare needle up behind the working needle so that your knitting is folded in half and the spare needle is behind the working needle, purl 1 from spare needle


knit 2 from working needle


purl 2 from spare needle


repeat last two steps until 3 stitches remaining, then knit 2 from working needle, purl 1 from spare needle.
 
For flat knitting work in rows in the rib pattern as established. If you are knitting in the round join the round at this point and continue in the rib pattern as established. When you have finished knitting, sew together the first couple of stitches. 
Also you can always try with different ribs, for example you can use this techinque for 1x1 rib or make two stockinette rows for more elastic beginnig.


2008 - 2013 Koala Kids Fashion. All Rights Reserved.